Sunday, November 27, 2016

Start Small...And Woodworm

Alright!  We are fixin' this seat!

I'm going to move ahead with smaller tasks than the heavily damaged back board.

This is the right side board.

I found that the heat gun is THE thing for stripping the thin paint from this project.  I can aim the gun directly in front of my putty knife and the paint skins right off like a banana peel.

Finished with 80 grit sandpaper, all surfaces.


Damage assessment:

Rear edge:

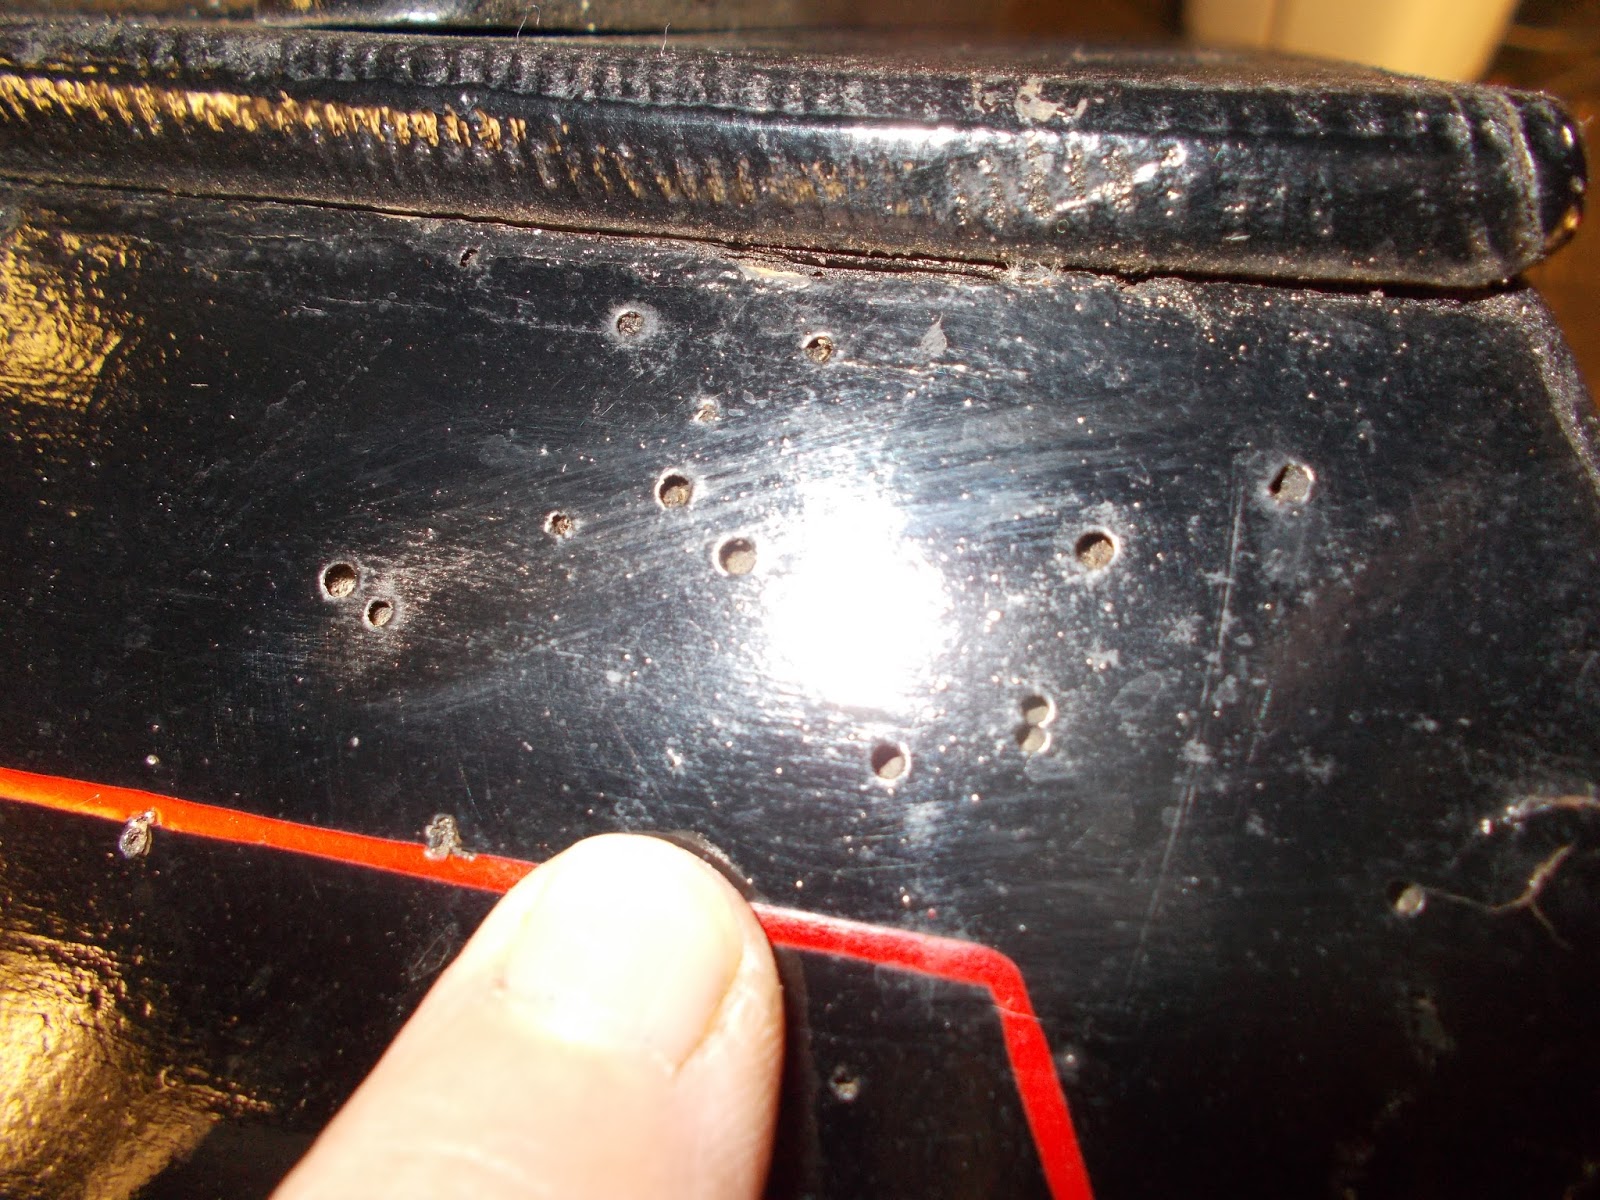
Nail holes and cracks
One loose chip


Bottom front:

One large, well adhered chip
Connects with a screw hole


Outer edge:

Heavy upholstery tack damage

Tomorrow is an Abatron day!


Meanwhile...


The step bolts and square nuts (considered essential to a "proper" restoration, where the original nuts were square) arrived and now the seat risers have been permanently reassembled.  A small touch that will look really beautiful when the final finishing is done!(Note, finish is protective but by no means "finished!"  Much more additional surfacing prior to priming and painting!)


On to seat repairs...


My little repair station is set up (in the kitchen!)  This is the right side board.  I dealt with nail holes and cracks first, drizzling Liquid Wood onto the end grain until it's fairly well saturated.  There is a small loose chip that has been put back in place.  The LW will saturate it and stick it back in permanently.


The damaged edge has been heavily smeared with  Wood Epox and is curing under the lamp.

The tack holes in the upper edge and a couple of screw holes have also been filled.

Tomorrow there is a substantial, adhered chip on the other end of the board to repair (gravity is against doing everything in one day as the LW runs out of the holes when turned upside down!)

The entire seat is now dismantled (except the bottom boards).  The grab handles have gone through the de-rusting bath and are covered with Bondo, awaiting sanding.  The corner braces on the seat back are now occupying the derusting bath.  Everything is moving along nicely.


WOODWORM
https://www.wisepropertycare.com/services/woodworm/what-is-woodworm/signs/

In all the years I've been trying to learn about carriage restoration, I find it interesting that I cannot recall a single mention of woodworm damage and its repair in the literature.

I have known since the start that this wagon was infested with wood-boring beetle larvae at some point in its history, but the small holes have been painted, the infestation has appeared dead for the 13 years I've owned the carriage.  It seemed that the damage was totally superficial.


Until of course, I uncovered the significant damage just under the surface of these seat boards!

So I've gone on a little search to learn more about woodworm.

First of all, I would never bring home another carriage with woodworm, ESPECIALLY one with an active infestation, identified by fine powder around the holes.  Woodworm is contagious!  To other carriages, to wooden structures... I would never risk it.

As I've found out, a piece of infested wood can look structurally sound on the outside, yet be a honeycomb of tunnels and galleries within.

As I go along with the repairs, I will be thoroughly testing the surfaces of the wood with an awl to discover the extent of any damage I find.

Thankfully, it seems that my choice of repair materials, penetrating epoxy and structural putty, are the repair materials of choice, although I already knew as much.

This morning I went to www.abatron.com and ordered more Liquid Wood, plus a quart of the companion solvent, Abosolv.  When I proceed on to the really infested areas, I want to thin the syrupy consistency of the Liquid Wood a bit, so it can really penetrate (not that it doesn't already!).

While I wait for these new materials to arrive, I have plenty of other work to do.

Once again, it might seem like replacing these simple looking boards would be easier.  However I have no idea how one would ever be able to copy the angles, arcs and convex surfaces that are not so evident in these photos.  To me it is what sets these antique "full lazyback" seats apart from modern construction.  Most modern wagons and buggies are built with flat panels.  No, these boards are definitely worth saving.

Continued...  


The first Abatron edge repair.  External view.

No matter how much of the stuff I apply, I always miss a spot.  One tiny nick to fix on the next round of repairs!


Internal view, Including a couple of screw holes that need to be re-drilled, plus a tack hole or two.

The loose chip can be seen embedded in putty on the left side.


The holes from upholstery tacks are finished...


After sanding the exterior surface down to 220 grit, I've applied a thin coat of automotive spot putty to fill grain, sanding scratches and other very small imperfections.


The spot putty is sanded back and the piece is coated with clear wood sealer.

Done. (For storage...there are still several surfacing steps before painting!)

Now, on to...


The bottom seat frame.

This is definitely a replacement, made of an inappropriate wood, cedar I think.

Most of the fastener holes are failing.  I've already drilled and pegged some of them.  The screw holes around the perimeter, I am going to dam up and fill with Liquid Wood.  That will strengthen the wood around the holes and stop the splitting.  Otherwise, there is just a wee bit of cosmetic work around the edges.


Sanded and ready for TLC.


A rack of hardware, all de-rusted, re-surfaced and primed, drying in front of the fire!

I am awaiting a few supplies before doing much more.

Thursday, November 24, 2016

The first "OH NO!!!" Moment!

...Came when I used compressed air to blow crud out of the crevice between the bottom seat boards and the seat back and sides.

Click on images to enlarge.

I discovered that in some places, it was only PAINT maintaining the surface of the board!!!!  Worms and dry rot had really excavated the lower right hand corner of the back board.

At this point I saw that I was going to really have to "go deep".  Fortunately, the eight screws holding the sides and back to the seat bottom unscrewed fairly easily.  The bottom boards are 100% sound...I do think they've been replaced.


  I had hoped I wasn't going to have to go this far, but it was clear that the seat needed to be fully dismantled to get at the damage.

I already knew that the corner nails had split out the wood, and that no filler will stick to the rusty heads, so I took the painful step of wreaking further damage on the wood by pulling the nails.  
Just as well, the lower nail was pretty much set in sawdust...


Right corner, seat back.  Yes, I can fix this.


I never knew!!


The damage is pretty localized, but there are a few worm holes along the length of the back board.  They ARE the enemy!

Epoxy repairs will be done in small areas at a time.


You'd think, why not just cut a new board?

The answer is because I cannot reproduce the subtle curve on the exterior surface of the board.  And I'm not so hot with angle cuts either.  Especially on surfaces that are cut in a faint arc.

Abatron actually will restore this board to structural integrity.

And so my work is cut out for me!  A little more than I had planned!

But that is what restoration is all about, Almost certainly, when you tackle a new area of the project, you can exclaim, "Here there be monsters!"


Wednesday, November 23, 2016

Grab Handles and Such...

First, a revisit of the seat railings, which spent the night in the electrolytic de-rusting solution.  They came out rust free, as expected.  They were given a thorough drying/cleaning, then coated with Bondo automotive body filler.  Tomorrow the railings will be sanded smooth and primed.


Mounting plate and nut did not require resurfacing so were simply primed.

Okay!!  On to the grab handles!


Externally, the grab handles are both useful and ornamental.  Internally, they are part of the seat bracing system.  Overall, they are heavily rusted.  The brace part was covered with a very nice "modern" (1960's maybe?) vinyl upholstery job.  As you can see, the fasteners are failing.  Just like the pinstriping job on the crappy paint...nice upholstery over failing hardware and dry rot.  I love this hobby!


Hmm, well, Blogger is not going to allow me to post text alongside the above photo, so the format changes a little bit.  Anyway, the right hand brace is a bit more securely attached, but is infinitely more rusty!

The grab handle/braces have been removed and prepared for the electrolyte bath.  

Unfortunately, I did a little "fingernail test" to an area of the wood on the seat and found a larger area of rot under the paint...yes, of course...  Still, nothing terminal.  Once the metal work has all been resurfaced and protected, I'll go after the wood.  


Tuesday, November 22, 2016

Seat Railings and Stuff

Today I began dismantling the seat.  I've always hated the fact that I couldn't get these seat railings off without removing all the upholstery, and their rusty, pitted ugliness is one of the main reasons why the restoration is finally being finished.


The first step is to knock off the remaining paint and any scale with the wire wheel.  This prepares them for electrolytic derusting, the detals of which can be seen here.


Closeup showing heavy pitting, which is characteristic of all the metal on this old wagon.


The railings are happily fizzing away in the electrolytic solution while I further inspect the seat.


I am so paranoid about the seat back warping or twisting while it is disconnected from its iron work, that I've gently clamped it between some pieces of scrap wood.  It's going to be separated from the seat for quite some time.


There was quite a bit of mischief hidden under the upholstery, including some small but significant spots of rot, and bunches of worm holes.  No thru-going damage.  Not hard to fix, but fixed it must be!

That's about all for today.  The railings will remain in the electrolytic solution overnight, and should be bright and shiny tomorrow, ready for resurfacing.


Sunday, November 20, 2016

Seat Risers

The seat risers are structures that are attached to the bottom of the seat, to give it height, and to fasten the seat to the box.

The first order of business on this mini-restoration project is to remove the cast iron braces, of which there are two on each riser.

Click on any photo to enlarge.


FASTENERS  


Oh, right...fasteners.  Throughout the removal of hardware on the seat I find these little buggers.  They look like carriage bolts, but they are not.  They are step bolts, which have a wider and flatter head than carriage bolts.  Interestingly, while most carriages are put together with a few thousand (tongue-in-cheek) 1/4 inch carriage bolts, these are smaller, #10 to be exact.  Not only can you not find step bolts at the local hardware store, but if you can find them on line, they usually sell in lots of 400-600.  After searching all morning, I finally purchased a box of 100 (I need about 24), along with boxes of #8 and #10 3/4" slot-head wood screws.  I then had to go to another supplier for a box of 100  #10/24 square nuts.

MORE DISASSEMBLY  


The four braces are labeled, dressed on a wire wheel/bench grinder, then buffed a bit with a Scotch Brite metal surface conditioning wheel .  Since these are hidden under the seat, no further surfacing was done.  They were degreased, blown off with compressed air, and hung up for a couple coats of Rustoleum rusty metal spray primer.  They're done for now.


The next step was to strip the paint.  I first tried stripping the old paint with a torch.  That worked really well, but I discovered that this paint is quite flammable, unlike my last project!  I will swap the propane flame for a heat gun.

There was just a skiff of paint on the surface of these pieces, which made stripping pretty easy.  I finished up paint removal with a random orbit sander and an 80 grit disk, then finished up by hand with 80 grit.  Time to go on a major search for repairable flaws.

The worst flaw is a well adhered chip (upper riser, upper right corner) that was probably produced when the vehicle was being assembled.  There was a very small amount of lead type filler in the crack that would have been used to conceal the flaw.  There are a few edge cracks and the ubiquitous worm holes.  The lower edge of the left riser is worn and chipped where it rests on the edge of the box.

The risers came into the house for repairs, because the repair material requires warmth to cure.

DEFECTS  


The major flaw is this chip, which communicates with the bolt hole and goes all the way through at the edge, but is solidly attached.  It appears to have been caused by a hole-drilling/screw insertion process on the upper edge.  There are two screw holes on the upper edge of the risers, and no matching holes in the bottom of the seat, which tells me the bottom of the seat has been replaced at some point.  Generally speaking, rot is a BAD problem in that area.  This makes carriage #4 for me, with rot in the lower corners of the seat. Worm holes are apparent, and the white stuff in the crack is ancient lead filler.  There are a few tight edge cracks, and that's about it.

The repair product of choice is a penetrating epoxy resin.

REPAIRS


The penetrating epoxy resin I have on hand is LiquidWood by Abatron.  It is an architectural product designed to penetrate damaged/rotted wood and restore its structural integrity.

There is a companion product called WoodEpox which is a lightweight putty for filling/building out voids.


The first task is to locate and "dam up" with masking tape, any potential escape routes where the resin might drain out of the damaged area.  There was only one such spot on the upper edge of the one riser.

The rest of the job is a babysitting game.  The resin will creep and soak into the damaged wood until basically, it sets up too much to flow.  Depending on a few factors, this can take forever!  Watch for "dimples" to form in the rounded surface of the resin "bead", and as long as dimples form, resin is penetrating and more can be added.  I use a 3ml syringe with a large bore needle to apply the resin.

LATER...


I babysat this project ALL afternoon.  The resin remained fluid for hours (which is not always the case!) and the wood absorbed tons of it.  As long as it flowed, and as long as the wood accepted it, I kept drizzling it into the cracks.

I ended up putting a small table lamp on the resin to hasten hardening.


While the resin was still tacky, it was time to mix some of the companion product, WoodEpox, and fill any voids that were not overflowing with resin.

The resin acts as a "primer" for the putty, giving it excellent purchase, and the end result should be permanent repairs.


I've created a lot of work for myself by applying the putty so generously...there will be a lot of sanding to do!

That may be awhile, but a little heat will hasten curing.  I think it takes about 1-3  weeks for the epoxy products to attain full strength, but I should be able to sand well before then, as long as the sometimes-fussy resin hardens sufficiently.


AND FINALLY... 


The repairs have cured and excess has been sanded smooth.

The outer surfaces and ends of the risers were then coated with a very thin layer of automotive spot putty  to fill grain and any remaining tiny imperfections.

The spot putty was then sanded back with increasingly fine paper, ending with 220.


The risers are coated with clear wood sealer.


And finally, the risers and brackets are temporarily reassembled.  Now I can quit worrying about the wood warping!

The repairs to these parts are now complete.  They will spend the winter in storage in the office awaiting painting weather!

The next stage will be to remove and refurbish the ironwork on the seat, and on to the seat itself!


Thursday, November 17, 2016

Work Begins

My original plan was to hold off starting on the wagon box/seat restoration until we'd had a chance to use the wagon to bring home a Christmas tree.

Since we rarely have a Christmas tree, it would only have been for a photo op, and I decided I'd rather work on the wagon right now than go through all that bother.

But first, I had a pending project in the shop that had to be finished up.  Two wheels from a different carriage were partially prepared for what was to be a thorough refinishing.  The task was reduced to a good deglossing, followed by a quick but reasonably attractive rattle-can re-finish.  Good for another decade!


The wagon seat comes off the box by simply popping up a couple of little latches, one of which can be seen in the lower right corner of the photo.

I have already reupholstered the cushion, which was originally done in the biscuit pattern shown.  I will probably re-do the sides of the cushion, which has a spring foundation and a wooden frame.  The seat back is still covered with its original leather upholstery, which unfortunately, will be sacrificed in the restoration.


The seat is now in the shop, lying on its back on the bench to prevent tipping backward.

It's time to inspect the seat minutely, to see what needs to be done, and what materials I need to have on hand.


As with the wagon gear, all the metal on the seat and the box is heavily rusted.  The only way to make this hardware beautiful again is to take it off, and in order to do that the upholstery must be removed.  I tend to dismantle metal parts at the last possible moment, because I'm afraid the wood will react badly (warp/split) if its left off too long.


Some tight splits in the seat risers...


...Minor chips...


And quite a few ancient worm holes!


A little superficial rot in the bottom corners...


...Loose and missing hardware...

Altogether, pretty straightforward.  This wagon always was a sound and beautiful prospect for restoration.


Further disassembly basically starts with taking the seat risers (the supports between the seat and the box) off.  They will probably be the first sub-assemblies to be treated, since they are small and a good way to "get into the mood" for the balance of the restoration.  This involved removing eight bolts, and of course the bolt heads lost their purchase in the seat wood immediately and began to spin.  So no nonsense, out came the nut splitter straight away.  I'll bag these and label them.  It's always nice to save any historical hardware but in the case of bolts, unless they are absolutely perfect, which is rare, out they go.  I will remove the metal braces from the seat risers, de-rust and re-finish them.  They are not visible so will not receive special treatment.  I'll use the seat risers to help me decide what method of paint stripping I'll use.


The "lazy back," the upper half of the seat back rest, is one gorgeous, unspoiled piece of poplar.  I was truly surprised to see that there is no paint or glued-on cloth on this plank.  Since this is its first exposure to the atmosphere in many, many decades, my first preservation act was to coat this plank with clear wood sealer.

The wood absorbed many, many coats of sealer before insoak finally slowed down.  This should help to stabilize the moisture content during the restoration.  Eventually, I will prime and paint all surfaces, but not for awhile!


This is the back side of the lazy back "squab" or upholstery pad, which is pre-made, then tacked into place on the seat.  The upholstery material is leather, the stuffing is "excelsior," which is a wood shavings product.  The backing is a combination of canvas, card, and oilcloth, or a forerunner of "Naugahyde", and the buttons are the prong type that I will replace them with.

That is the extent of today's work.  Tomorrow I'll start in on the seat risers.  Materials I'll need to source for now are more wood sealer, some grain filler and a healthy supply of sandpaper.