Wednesday, December 28, 2016

Construction Notes, Beetle Damage, Panel Split Repairs and Other Stuff

I think the advice bears repeating:  Do not buy a project carriage that has been attacked by wood boring beetles!

This is a shot of the underside of one of the wagon floorboards.  It's a surface I've never really seen, until we pulled the wagon box off the gear and turned it over.  Those little holes are beetle exit holes.

The beetle larvae will leave the surface of a board, but completely excavate the interior, leaving nothing but sawdust (actually bug poop) behind.


Such was the fate of this heavy beam, or sill, on the right hand side of the wagon box.  The previous owner painted over what looked like a sound surface, but when I tested the surface with a screwdriver, it was soft, then whole chunks of wood broke out with moderate prodding with a chisel.  Once I gathered the courage to dismantle the box, the back end of the board broke off while removing it.

I don't think this is dry rot.  I think it is beetle damage.  That's why the bugs are called "powderpost beetles."  They can leave a post standing, but turn the inside into powder.

I spent many hours repairing beetle damage in the wagon seat.  When I turned the wagon box over and saw that all the floorboards are peppered with beetle holes, my heart really sank.

I wasn't familiar with the construction of the wagon, as it uses no wooden framing, and I was scared to death to attempt dismantling.  It turned out that it wasn't that complicated after all, and I got the board out safely.  At this point I decided it was a no-brainer to have a wood working company not only mill me a new sill, but also new decking to replace the bug-shot boards.

Construction


As I mentioned, there's no wooden framing on the wagon box.  It's built like a colossal packing crate.

What there is instead, is a pair of these metal corner braces, which I realize you can't make hide nor hair of.  On the inside of the wagon box corner, is an iron brace, complete with mount for the dashboard.  The outside of the corner is covered with a sheet metal plate.  Bolts hold the two together, and there is a bolt that goes through the sill.

The two side, and one front panel of the box, are lapped and nailed together.


This is the inside iron brace, with the dashboard mount to the left, which would be the upper edge of the vertical panel.  The right hand end bolts through the floor.


But the thing that had me scared to death about dismantling was the methods used to attach the vertical side panels to the sill.

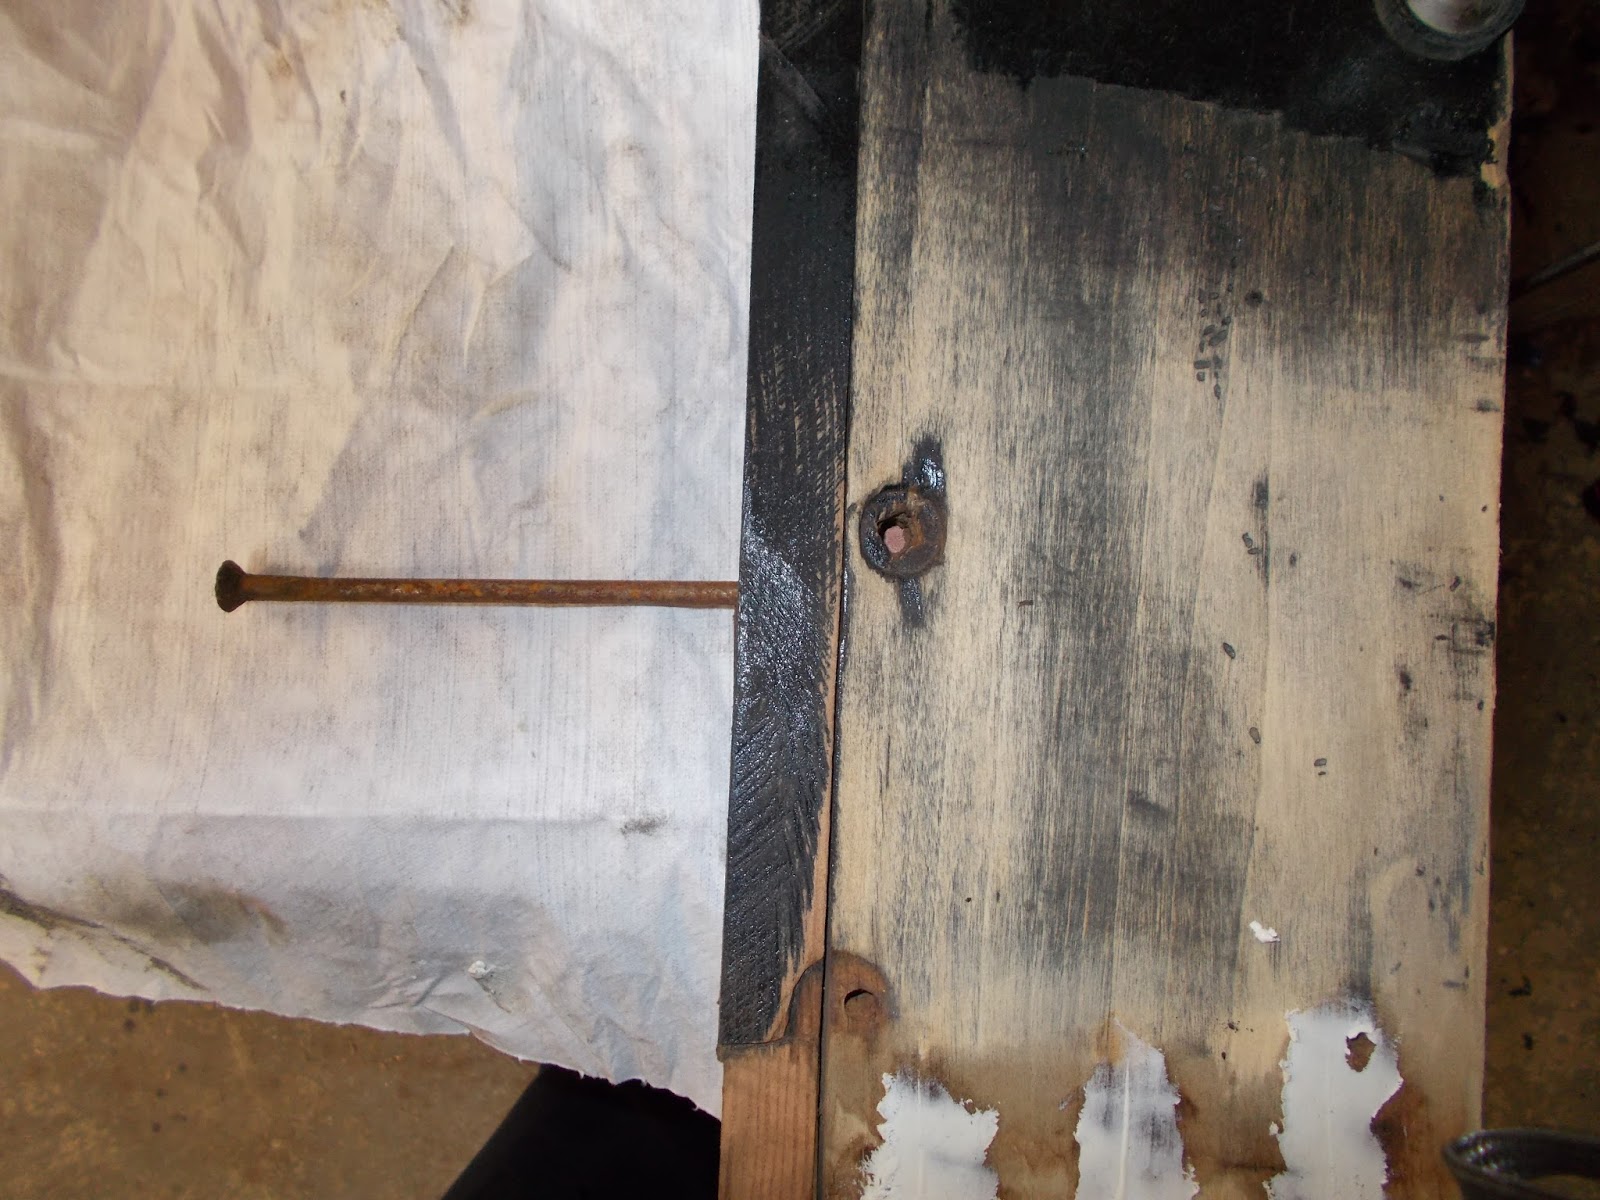
This picture is of the wooden side panel, just detached from the ruined sill.  When I got an idea that the side panel was bolted to the sill by means of these LONG rods, which pass through the panel from top to bottom, and through the sill, I had a fleeting notion that I would somehow destroy the panel by trying to remove them.

The big problem with getting these bolts out, is that like all the other fasteners on this wagon, the maker saved money by economizing in this department.  He didn't use a single washer on a single nut and as a result, all the nuts are screwed right down into the wood and inaccessible to either wrench or nut splitter.

And then there were screws, from the underside of the sill into the side panel.  Sometimes getting screws out of an old carriage is just about, if not completely, impossible.

As for these screws, they ended up being like all the other screws I've encountered on the wagon.  They'd excavated their hole sufficiently, that they pried out easily, more than unscrewing.

Getting at the buried nuts on the rods was more of a challenge, and I ruined all the rods, but I can make new ones.  I ended up putting an oversized socket over the nuts and smacking the socket with a hammer, to crush the wood fibers down enough to get a tool on the nuts.  It was a tough job, but what a great feeling when the beautiful, and astoundingly undamaged side panel fell free from the rotten sill!


Here's an example of the condition that all the fasteners are in...and this is a good one!


Tailgate hinge bolts.

Today I named the wagon "Rusty."


The Panel...


The most urgent matter with the side panel was inspecting the bottom edge for rot and beetle damage, as it joined the terminally rotten sill.

First of all, the sill itself is SOUND under the panel!

But more important, there appears to be not a single SPECK of bug damage to this plank! (Update:  Oops, four specks.)

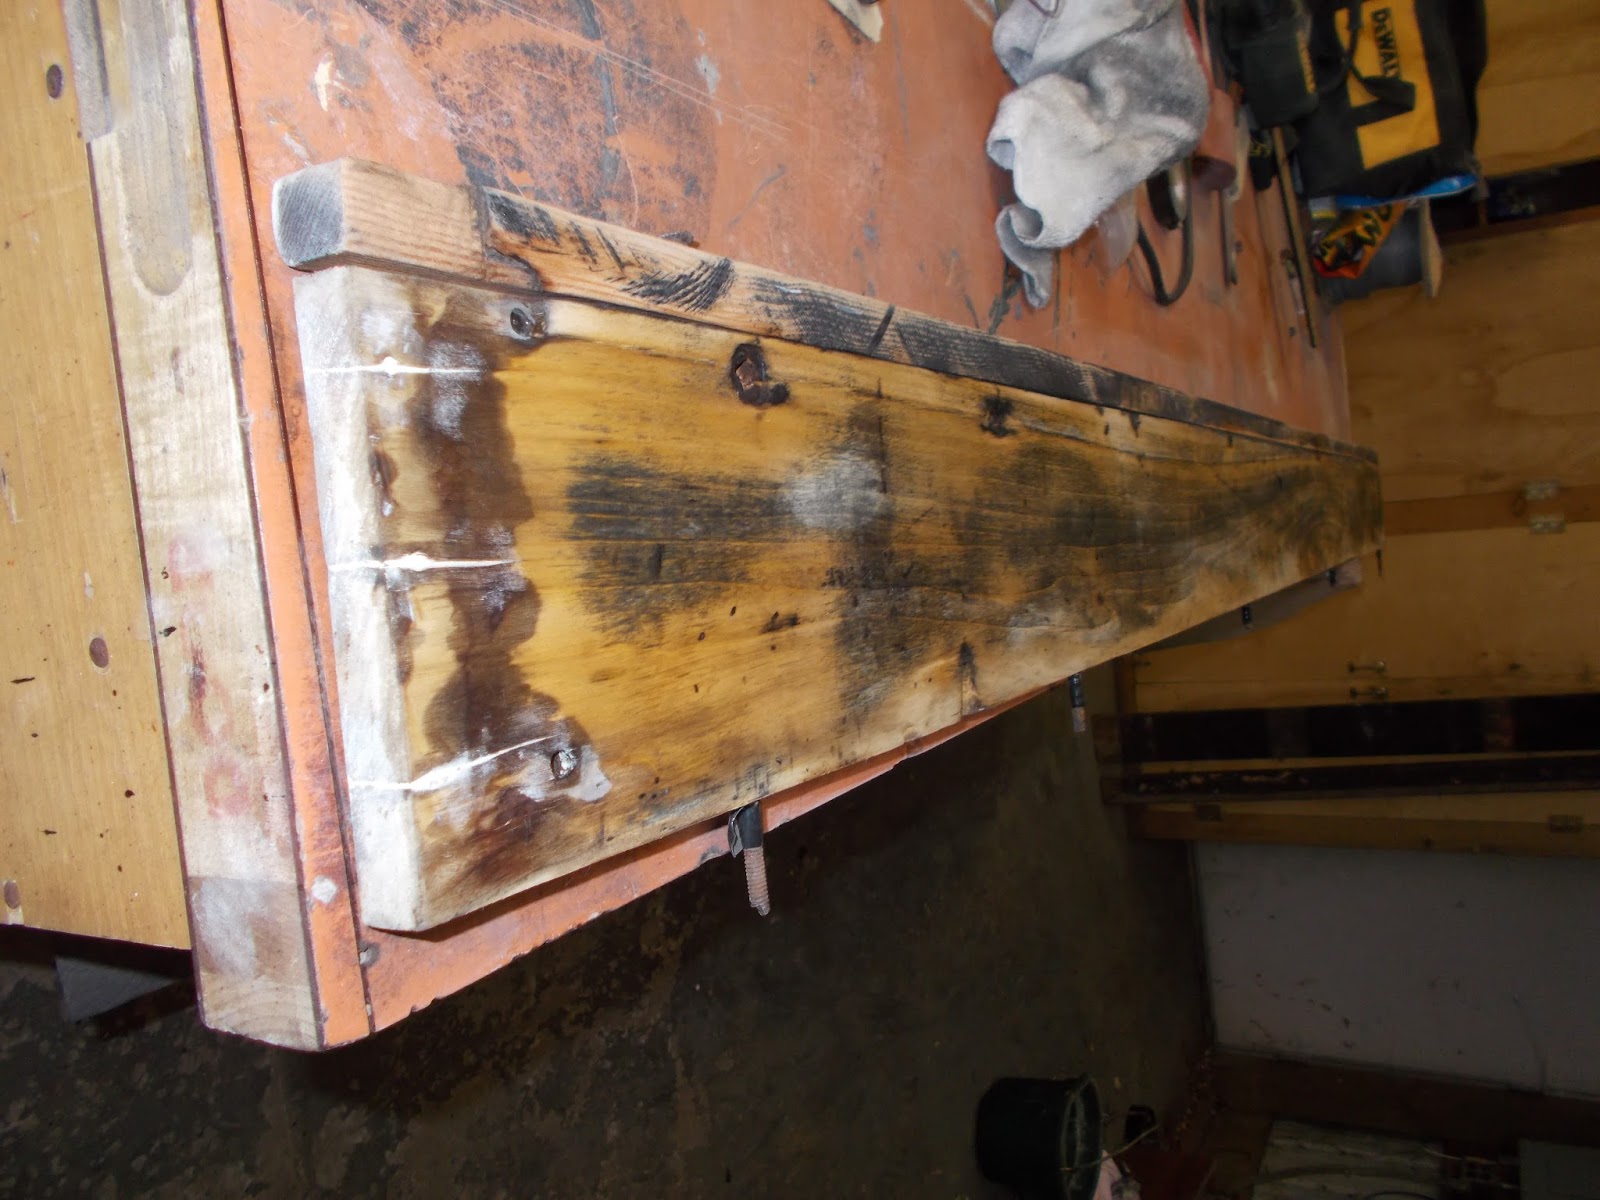
So this is the front end of the plank.  That piece on the left that appears to be split off is, in fact, a separate piece of wood.  The outer edge of that piece is milled to form a nice trim edge.  It's a different type of wood, and is very sound and strong.  Looks like fir.

So initially, the main damage that I can find to the side panel is these three split out nail holes.  I can't find a split anywhere else on the board (so far).  (Update:  The bottom edge of the board could use just a little work on some very small splits around screw holes.)  Currently I have in process a cool repair that I picked up from an architectural restorer's blog.


Drat!  Blogger's done it to me again.  Format change.  Anyway, in the above photo, I've sanded the back side of the damaged board really well and applied Abatron WoodEpox all around the damage, pressing it in really well, to form a DAM, which will contain the Liquid Wood, which I will pour into the splits from the other side.  When the repairs are cured, these dams will be sanded back and become a permanent part of the repair.

A few hints to begin with.  WoodEpox doesn't really like to stick to dry wood all by itself.  I tried thinning it with Abosolv a little, but it would be much better to either "prime" the surface with Liquid Wood, or mix a little LW into the Wood Epox, just enough to make it a little stickier.  I was too impatient to go through the 10 minute induction phase with the LW, so made sure the WE was well stuffed into and around the cracks.

The next most important thing is, the WE has to be SET UP before phase #2.  Otherwise it will dissolve into the Liquid Wood!  I found that out by smearing it over uncured LW in bug holes.  It just dissolved and went right down into the bug holes!

Tomorrow, I'll begin the process of filling the cracks with Liquid Wood from the other side.  The LW will bond to the WE dams.


While the WoodEpox was still just a little tacky, Liquid Wood was poured into the cracks and nail holes until it finally quit absorbing into the wood and began to set up.  Repairs sat under a carefully positioned heat lamp overnight and were hard about 24 hours later.


12-28-16 Update... 


Today I contacted Woodcrafters, a wood seller/shop in Portland, OR.  They have agreed to take on my project!
So one task today was to wrestle a floorboard out to take with me, as they will be replacing the floorboards as well as the sill, and a small plank that sits in the center of the seat.  In about three weeks, reassembly will begin!


Today's other task was to strip the inside surface of the right side board.  This shows the nail hole/split repairs.  This side of the plank will not be relieved of its "character" as it never had a high finish to begin with.  The surface took coat after coat of sealer!


The exterior surface got relieved of all its defects and sealed.

I can now add another component to the growing inventory of repaired-and-waiting-for-paint parts!

Tomorrow the front panel comes off - necessary to remove/replace the floorboards.  After that, work will slow down considerably until the new planks arrive.


Friday, December 23, 2016

Body Off!

I wasn't going to do this, buuutttt....

Lots of boring winter left, and if I don't do the box this winter, it either won't get done, or it will be disassembled and laid up for yet another year.

The reason being, there is only a very brief window where I can paint in my low-tech operation.  Winter is the time for repairing, summer for painting....along with all the other work screaming to be done in summer!

So, let's have at it and get the body ready for a new paint job.  Maybe I can get all my painting done within a few weeks and be done by next spring.  Thankfully, the gear and wheels are long since done, except for a bad scrape on the hub of the far rear wheel, which I'll tend to pretty quickly.

So Here We Go!


First comes removing some peripherals, like this heavy brake.  Dashboard, steps and rub rollers also have to come off.


Considerably lightened, we were able to hoist the body off the gear by hand, after undoing 12 bolts.


I'll take this opportunity to clean and oil the 5th wheel.  Heck, maybe I should try pinstriping the gear!

Tomorrow I'll start in on the interior of the box.


Almost a Deal Breaker...


This isn't much of a picture, but what you're looking at is an excavation of beetle damage in the front end of the right hand sill, a heavy hardwood beam that runs the length of the wagon box and to which things like brakes attach.

Poking around with a screwdriver, I knew the sill would need some work, but when I took a chisel to it this morning, sections of wood crumbled away.  There is some amount of damage along the entire six or so feet of the sill.

I came very close to calling it quits on the wagon today.  The method of assembly of the wagon box is absolutely diabolical and I am dangerously outside my skill set on reproducing a timber like this.


However, we turned it upside down on the saw horses, and the fasteners started falling.  As I started dismantling it, I learned the construction technique and soon became confident that there's nothing here that can't be fixed.


Eventually the sill came free, along with the vertical side panel of the wagon box.

In order to keep the side panel from twisting, I am going to leave it attached to the damaged sill until I'm finished preparing it for refinishing.

Then I will detach the ruined sill and take it to a woodworking firm in Portland to have it reproduced.

May as well publish this post, and come back when the new sill is ready to install!

Thursday, December 22, 2016

Tailgate

The wagon's tailgate consists of a single flat board, hinged to the wagon bed with three strap hinges.  There is a strip of "specialty" steel channel on the top edge, and it latches shut with a spring steel latch on each side.

It is a small piece, suitable for painting with the seat parts, if I don't get to the wagon box this winter.


As with everything else on this wagon, rust is very bad on the tailgate metal.  Two of the three hinge pins were rusted solidly to the part of the hinges attached to the wagon.  The nuts on the strap hinges were solidly rusted to the bolts, so the nut splitter was employed to temporarily free the tailgate from two of its hinges.


  Today I managed to wrestle the pins out of the hinges, so here are all three straps, along with the upper rail.  They have been cleaned of scale, dirt and paint with a wire wheel and are now in the electrolyte bath for de-rusting.

I want to get the metal work finished first as just like the lazyback on the seat, the tailgate board began to twist immediately when freed of its ironwork.  While I'm not working on it, the plank is clamped to the workbench.


Later...

The ironwork has been pulled from the derusting bath and is in the process of being surfaced and primed.

The tailgate itself is a single plank with many cracks in the surface of the paint.  There are no through-going cracks in the board, except near some of the bolt holes.  What's odd about the board is that the grain is peeling up at the edges, kind of like an onion.  This is what has cracked the paint.


And here's the tired old board, in want of a lot of surfacing before it's fit to take a coat of paint!    The board wants to twist, so is currently bolted to a piece of heavy plywood for repairs.


Once again, it's Abatron to the rescue.  In this case, there's no actual damage to the board, except for one bug hole and a small chip out of the bottom edge.  I mainly just want to arrest the peeling grain on the board, so I drizzled Liquid Wood along the grain.


After curing overnight, the Liquid Wood was sanded flush, then the board was surfaced with grain filler, sanded again, and sealed.

In the meantime, the three hinge straps and the top rail have all been cleaned, derusted, resurfaced and primed, and are drying in front of the shop stove.  The tailgate will be reassembled tomorrow!


And Finally...


Well almost...

The tailgate panel and its hardware are reattached.  I have to acquire some slot headed machine bolts for the hinges and "tighten up" the screw holes in the cap rail, but otherwise, repairs to the tailgate are finished, and it can go into storage along with the seat.

The only remaining thing on the wagon in need of repair and paint preparation is the box itself.  No bringing THAT in the house!


Saturday, December 10, 2016

Seat Repair Progress and Reassembly

But first...

Satisfying the irresistible urge to put something back together!  LOL!

(Note:  The brace part of the grab handle will be covered with upholstery and was not surfaced.  The visible grab handle has had all the rust pitting filled.)

The corner bracket on the back of the board holds the side and back together, and provides a mount for the upper back board.  The bolt spins in the hole so I'll have to dowel the hole and re-drill it.

The Bottom Frame

Damage to the bottom seat frame is pretty minimal, but of course, it's much newer than the rest of the seat!  Be that as it may, the frame was replaced with a soft wood that didn't hold fasteners very well.  Add that to the fact that all the fasteners on the seat seem to be about one size too small...

Anyway, there were signs that a knock to the board that the lights are shining on might result in a piece of the board splitting off for kindling.  The vertical panels are screwed to this board from underneath.  The clamp is holding a split through a screw hole together.  The split is about 6" long, heading inexorably toward the edge of the board.I filled all the screw holes with Liquid wood and let the resin soak into the surrounding wood for awhile before draining it.

Otherwise, the lights are just shining on some cosmetic work...the end grain in these areas is very "ridgey" and ugly.


The bottom frame repairs have been sanded smooth and wood sealer applied.

Now I am starting to enjoy the process of putting the pieces back together!

The left side panel has repairs curing, and the more extensively damaged back panel is waiting for a fresh supply of repair material.


The left side of the seat has gone through the same procedures as the right.

Now it's time to do something about the "powderpost" bug damage to the rear panel.


The Lower Back Panel


I'm now ready to take on the heavily bug-damaged lower seat back panel.  Some people will think I'm nuts for thinking I can fix this with epoxy, but in fact, I am absolutely certain that the repairs will be permanent.

Since I've never encountered boring insect damage before, I decided to learn something about The Enemy.  The main thing that I learned is that those tiny shot holes that I have circled are not ENTRY holes, but rather EXIT holes, made by the mature beetle.  They could have been munching away at the starch in the wood for as much as 2-3 years!  The large encircled area is excavation that was uncovered by blasting the surface with compressed air.  There are also exit holes on the exterior surface that are almost certainly connected to the inner surface of the wood.  I tested all the surrounding area of these holes with a knife and the wood is solid and not punky or hollow feeling anywhere.  The tunnels will be packed with "frass", a euphemism for bug poop, which looks like ultra-fine sawdust.

There is extensive nail damage to the panel edges.  I'll spend tomorrow injecting the damage with thinned resin, and build out the missing wood with epoxy putty.


It will be interesting to see if any of the resin, injected from the inside surface, tries to drain out the other side! (Update:  It did not.)


Repairs...


As if bug and hardware damage were not enough, atmospheric conditions - heat/cold and damp/dry cycles - wreak their own special havoc on wood.  On an old buggy seat, this is a familiar sight, a corner joint that has pulled apart over time, leaving an ugly gap.  Then, of course, the replacement bottom frame was almost certainly not an EXACT copy of the original, so the dimensions could be slightly different.  I also think that the slight stain visible along the edge of the board suggests that there was originally a metal plate covering up the joint.  This was pretty common on this class of vehicle.  I'm guessing it was rusted through and removed during the last "restoration".  Such a plate could have covered up an inexactly fitted joint.

The left corner is still a good, tight fit, but the right corner is a very loose fit.


The seat on my last project  makes this problem look absolutely trivial.  There was a considerable gap between the upper and lower seat back panels that was the result of a less-than-perfect replacement of the lower panel.

I decided on this project, to use the same technique I'd used to fill the gap on the previous project.  That repair, by the way, is still invisible.


In preparation, I applied plastic packaging tape to all surfaces that I did not want Abatron to stick to!  I applied a very thin coat of Vaseline to the plastic to act as a release agent.


Then I began drizzling Liquid Wood into damaged areas and end grain on the right end.  The Abatron instantly showed bug tunnels just under the surface by turning them dark!

I stayed with this phase until penetation slowed down so much that I figured the LW was just soaking into sound wood.


Wood Epox is applied thickly over end grain and repairs...


Then the panel was bolted and screwed tightly into place!  The Wood Epox remains workable long enough to allow me to bolt the panel up, then sculpt the damaged corner to fill all the gaps in the joint between the back and side panels.


Do I roll a great joint or what?!


I went out to feed the horses and clean the barn, and when I got back in, the WE had set up enough to cautiously remove the panel from the seat.

The result is a nearly perfect impression of the mating surfaces of the joint.

Tomorrow I will sand these repairs smooth, then give the left hand side of the board the same treatment.


Same repair...


...other end.


Interior...


...exterior.


2/2/17 Update...

I eventually came to the realization that this panel, along with the bottom seat frame, is also a replacement and not original.  For the longest time, I couldn't account for the mismatch in the corners, even after epoxy repairs.  Then I realized that the panel is a very close, but imperfect, reproduction of the original.  The angles of the corners are simply mismatched, partly because this replacement piece does not have the subtle convex curve of the original.  Fortunately, the epoxy repair will allow me to shape the ends of this panel to match the side panels.  Curiously, this is the second carriage in a row that I've restored, which had a replacement panel that did not match the sides.  It must be a vulnerable piece.


The last phase of repairs to this board is to fill the beetle exit holes on the exterior surface.  I've filled these holes dozens of times with thinned resin.  Today I filled them with full strength resin (the thinned stuff never stopped soaking in!) and capped off the holes with WoodEpox.

And Finally...


Eventually, the beetle damage repairs set up and were sanded flush.  The panel was smeared with spot putty and all the grain, nicks and scratches were sanded level with the surface.  I set the panel aside to unclamp the upper seat back panel  (it was clamped to prevent twisting), and had the paint stripped very quickly.

Unlike the other boards on the seat, there is not a speck of actual damage on this board.  Even upholstery tack holes were minimal.

However, as I was working on the board, filling grain, etc. it became obvious that the board was trying to twist!  I rushed through my work!  I clamped the board to the work bench to sand the grain filler and coat the board with wood sealer.

I brought each board into the house when they were barely dry.  There was a bit of a struggle to get the corners of the lower panels to line up but eventually, they were permanently bolted and screwed together.


Despite my fears, the hardware on the upper panel plopped right together with the matching brackets on the lower panels!  There is no distortion anywhere.


So now, the seat can hibernate in the office for the rest of the winter, until painting season arrives!

There are still lots of little things to do, plus plenty of sanding before painting!

But for now, this part of the "restoration" work is done.

The next project is the wagon's tail gate!  Really, it's the only other part of the wagon that exhibits real damage, in the form of split wood.  Lots of rusty iron to clean up, too!

(Update...I could not have been more mistaken about an apparent lack of damage to the wagon box!)